Sourdough croissants

A guide to patisserie quality french laminated pastry using natural yeast!
Go straight to troubleshooting!!
This is only one way of doing this! I am documenting what worked for me and would work for anyone who follows these steps. Once you are familiar with the process, feel free to make changes, tweak proofing and retardation times to suite your schedule
To get most out of this post, you need to have a sound knowledge on sourdough baking and some experience in laminated pastry
If you don't have any baking/ sourdough/ lamination experience before, I strongly suggest you to start from sourdough baking first. Then perfect your lamination, using puff pastry and Yeasted croissants before moving on to sourdough croissants
I will skip the long boring story about my love for laminated dough and get straight to the technical details. I have another post where I talk about nailing the croissants at home. Those points are still valid here too.
The most important factor here is the strength of your starter. Only you know your starter, so it is practically impossible for me to tell you when it is at it's peak or how much of it to use. But for the moment, I will assume that you have an active starter, with a good track record of making nice baked goods.
I generally consider a starter as an active starter, if it doubles(in a mason 12oz jam jar) in less than 6 hours (at room temperature 25C), once fed with 1:1 flour and water and a 1:5:5 ratio(starter:water:flour). This is just a very rough gauge I use, and has worked for me.

To rejuvenate your starter, make sure you feed it for a whole day (every 6 hours) and that it is not starved or tucked in a fridge. Once your starter is active and bubbly (just before it collapses) is the perfect time to make the sweet starter for the croissant dough. This may sound like a lot of work, but if you are constantly baking with your starter, you usually know when your starter is at it's peak, and for best results we have to use it just before it reaches it's peak.
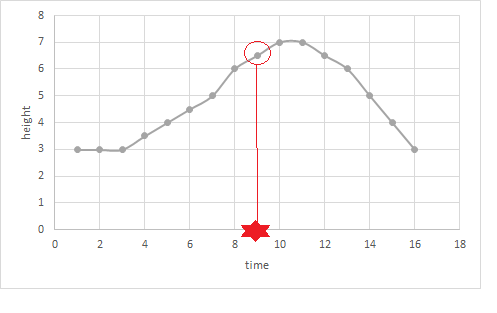
Red circle shows the starter height just before it's peak and so the red star is the time we should use the starter!
For the croissants we will make a stiffer starter, meaning using less water. In this case it is a little less than 40% water. This makes a dough ball rather than a paste. If you are not used to making stiff starters, this might seems strange at first. So by reducing water, we will slow down the activity and also, this gives us a chance to control our final dough hydration. The starter also use two tablespoons of sugar ( this can be either brown or white) This is a considerable amount of sugar and could slow down fermentation. That is why we use 50% culture. A starter made with these ratios will take roughly about 12 hours to reach it's peak. This suites our long and slow process, giving us enough time to let the dough relax (in the fridge of course) as we will be rolling out by hand.
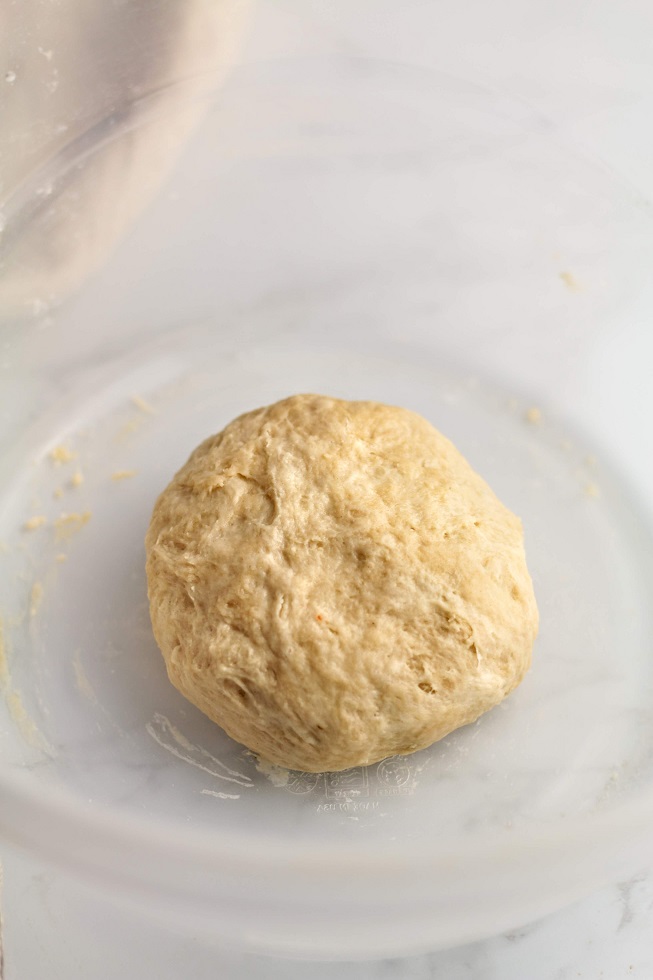
To make the starter, mix the starter ingredients and knead into a firm ball. Make sure everything is combined. Now let this sit for 12 hours on the counter in a big plastic container covered with a lid or cling film.
In warmer weathers, reduce this time to may be 10 hours or find a cooler place for it to sit.
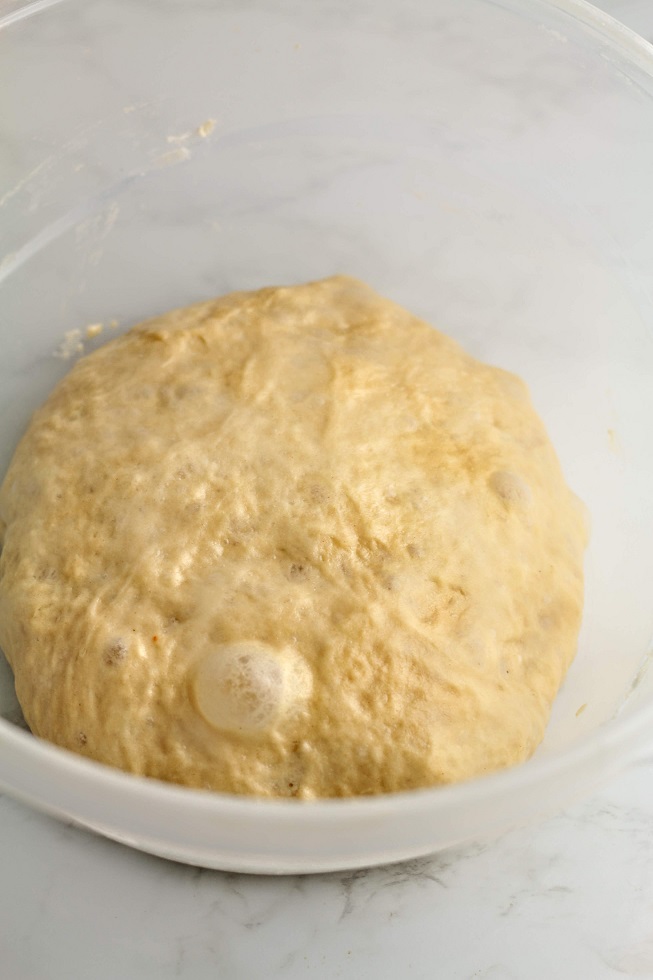
The dough will be expanded to about three times it's original size and would feel like a sponge when you touch it. The texture will be airy and mesh like and would smell slightly acidic. This is now ready to be mixed with the dough.
To make the dough mix all the dough ingredients and the starter sponge in a stand mixer and mix until everything is combined. Add water gradually just until you get a firm dough. When the dough forms, take it off the mixer on to a bench surface and knead slightly by hand, just to make sure it's consistent and no lumps are present. You do not have to make it smooth, just make sure everything is properly mixed.
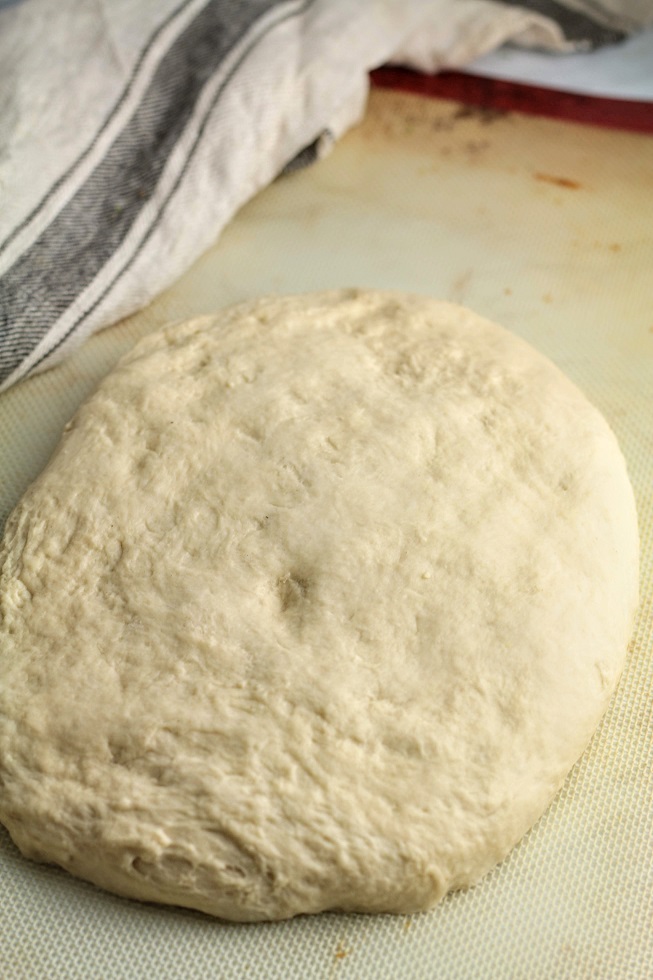
Then flatten the dough slightly, as shown in the picture below, wrap it in cling film and refrigerate for about a day (24 hours) If I mix the dough around 11 am on Friday, I usually refrigerate it till Saturday morning (9 a.m or 10 a.m). I usually do this to fit my schedule,and this retardation is forgiving, so it doesn't matter if you over do it by a couple of hours.
This long slow proof allows the yeast to multiply but without making the dough going soft. If we proof too much at this stage, we will be losing all the air during the lamination. So this is just to let the yeast kick start their fermentation.
After the long retardation, now we are ready to laminate the dough. This is the crucial bit. This is where the layers are being added. The neater the layers now, the prettier your croissants will look later.
Adding a little flour to the butter will stabilize it. Because at home, we don't have the dough sheeters, which roll out the pastry in one go. Instead we have to try rolling several times using a rolling pin. This takes time and dough sitting for too long in the room temperature isn't a good thing as the butter tend to melt away, taking the layers with it.
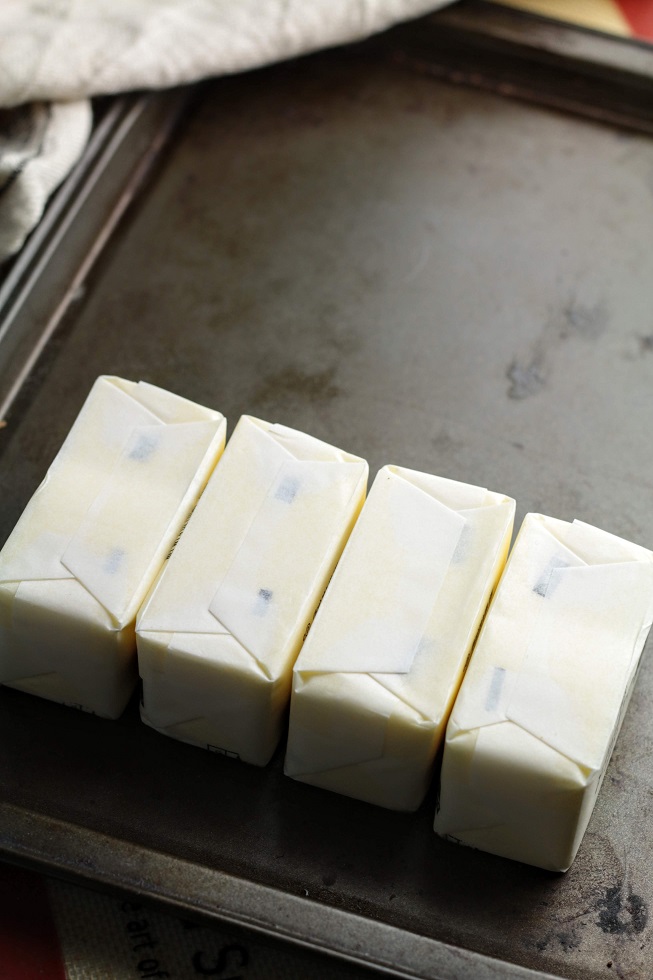
We will start this by making a butter block. I use four butter ticks and about 1/3 cup of flour to make the butter slab.
Any butter with a higher fat% will work for this. Usually most butter will have at least 80%. Also butter with less moisture will be easier to laminate, because they don't go rock solid when chilled.
With practice you can make any butter work. It is a matter of consistency.
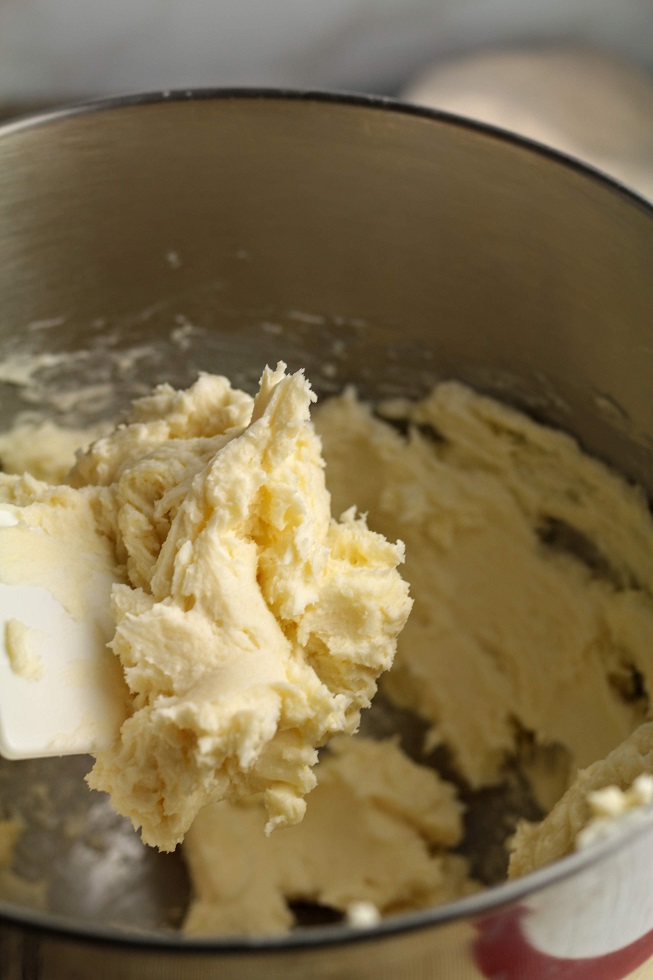
As you get more practice with lamination and learn to speed things up, you can skip adding flour to butter
To make the butter slab, let butter go a little soft, just until it feels like play dough. Now all we do is mix butter with flour.
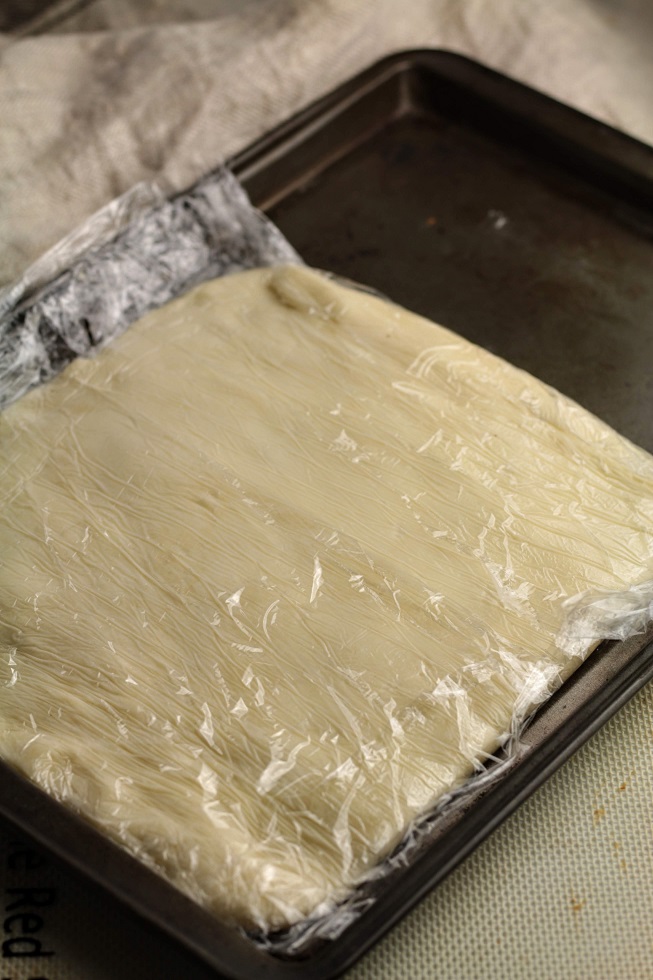
Take the butter mix out and flatten it out between two cling films or parchment. The slab should be about 3/4 centimeter in thickness. Make it into a neat rectangle or a square (about 9" by 9" for this dough). Refrigerate this to firm up. Check this video.
For the lamination to start, the dough and the butter slab should have the same firmness. So that when we roll out, the two will expand harmoniously creating an even layer of butter and dough.
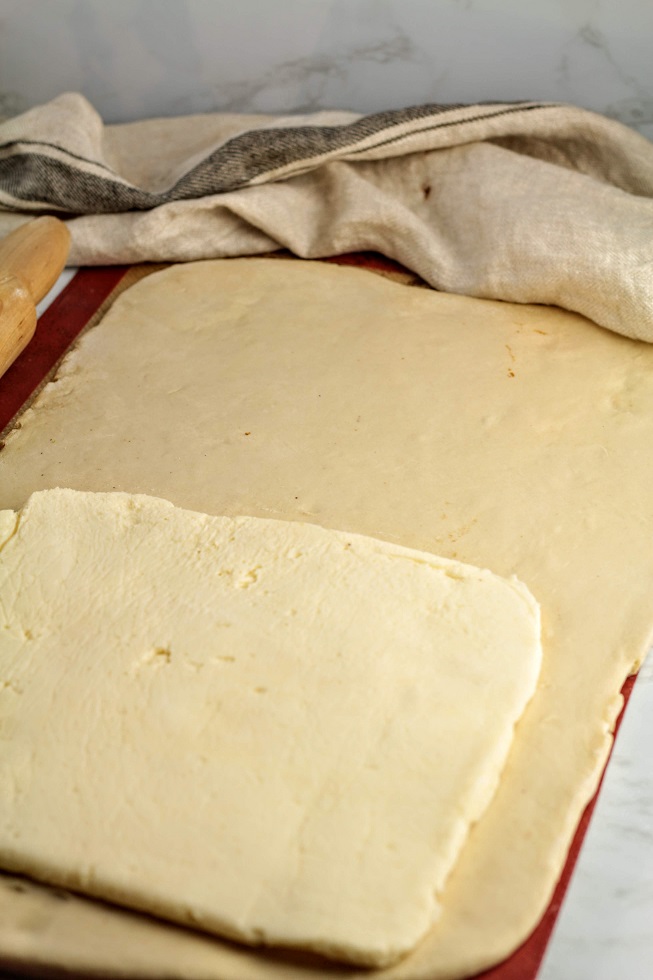
Take the butter slab out before the dough and let it go a bit soft. Not too soft. 5 minutes or so will do.
Take the dough out of the fridge, and roll it out to twice the size of the butter slab as we are going to wrap the butter with this dough. Check the image. Check this video to see how I do this.
When rolling out the dough, lightly dust the bench and use firm motion to roll out the dough to one direction. Lift the dough up and re-flour the bench to stop it from sticking and stretching too much. If your dough feels elastic let it rest in the fridge for 10 minutes before continuing.
Now wrap the butter slab with the dough and seal all sides. Now place the dough so that the closed side (the folded edge) is on either on your right or left. Follow the diagram for the folds. We will do three letter folds. If you are worried, stop at two letter folds or you can do two book folds if you like. The more you folds, the more you handle the dough and the risk of butter being melted gets higher, if you are not careful. Check this video.
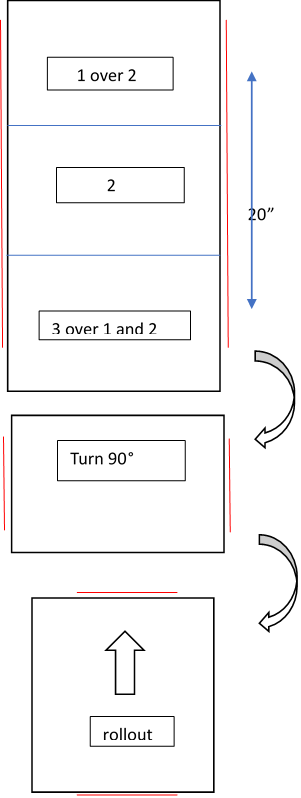
Roll out the dough to about 20 inches and do a letter fold. Wrap and refrigerate for about 30 minutes. Rotate the dough 90 degrees and roll out to 20 inches again, wrap and chill for another 30 minutes. Take out the dough and give another letter fold. Repeat one more time. Place back in the refrigerator for about 30 minutes and roll out to 20 inches. Now we are done laminating.
After the final fold wrap and let this dough rest up to 10 - 12 hours (minimum of 4 hours). Then we need to roll out the pastry to actual final thickness to cut out the shapes. What I usually do is cut the pastry in to two and roll out the two pieces separately. That way it is easier to handle and one half can sit in the fridge until I roll out the other half.
Final dough thickness should be about 1/2 centimeter.
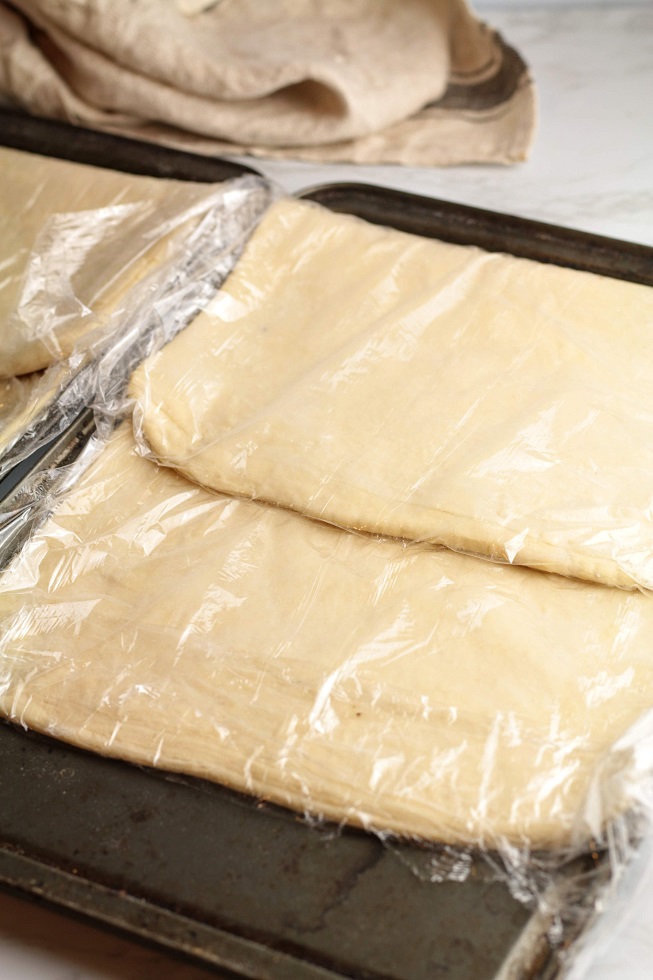
Take your time doing this. If the dough seems elastic, let it rest in the fridge and roll out again. Once the final width is achieved, wrap and chill for another two hours(al least) before cutting out shapes.
Use a ruler or a cardboard block to cut the triangular shapes. And make the croissants as shown in the pictures below.
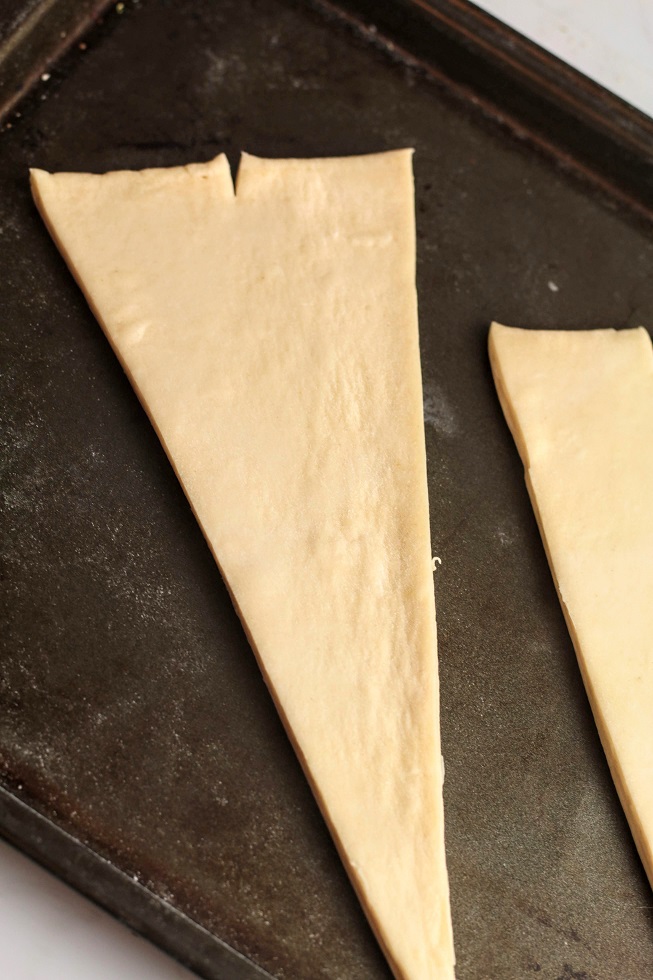
Make a slit on the top edge and stretch it slightly.
size before stretching :8cm at the wide side, about 20cm length
size after stretching :8cm at the wide side, about 25cm length
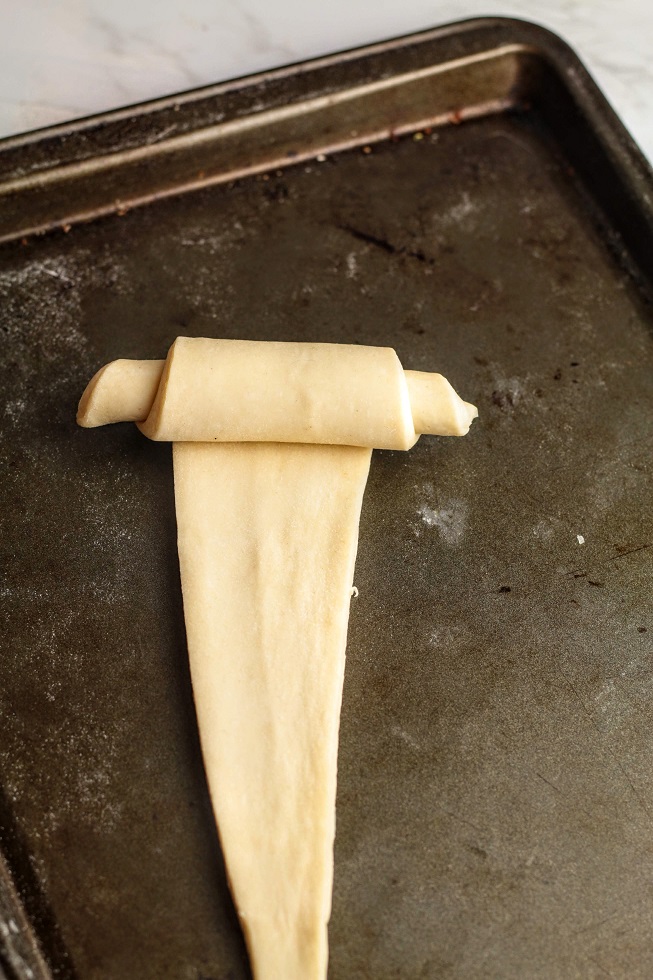
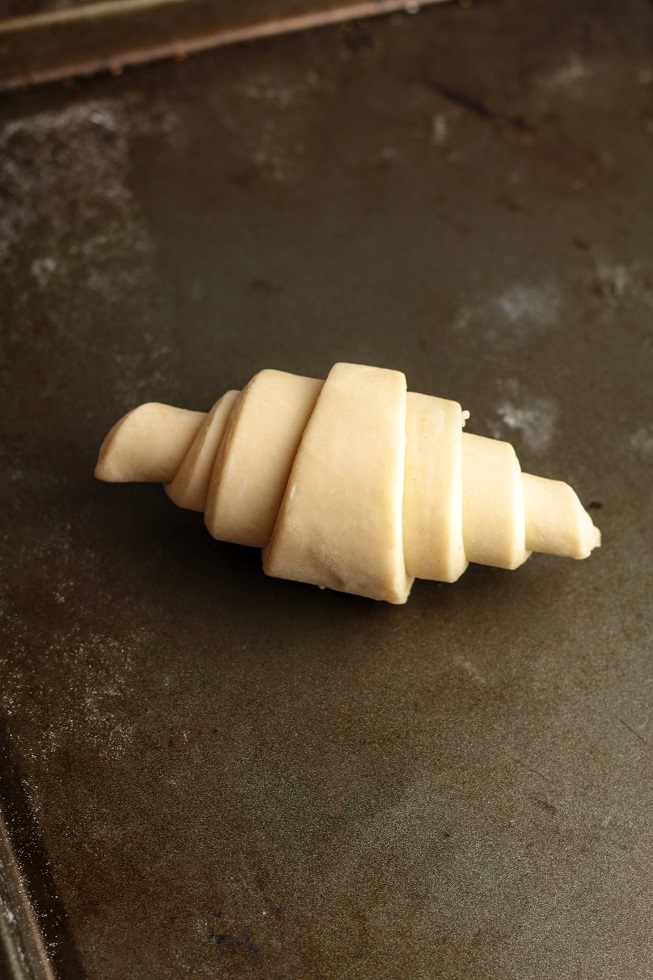
Once these are done, you have three options:1. Refrigerate them for about 12 hours/overnight and proof and bake later2.Let them proof straight and bake on the same day3. Freeze them for about 2 weeks. Thaw in fridge, proof and bake
To prove these, place on a tray cover and let sit for about 8-10 hours. If you want to speed the process up, place in a slightly warmer place. I usually make the shapes in the midnight, let them sit there covered until morning and them place them in a switched off oven with a cup of boiling water, for about 5-8 hours. Then they are usually ready for morning tea (or brunch). This may take longer in colder weather and also depending on your starter activity. Look for the visual clues rather than time.
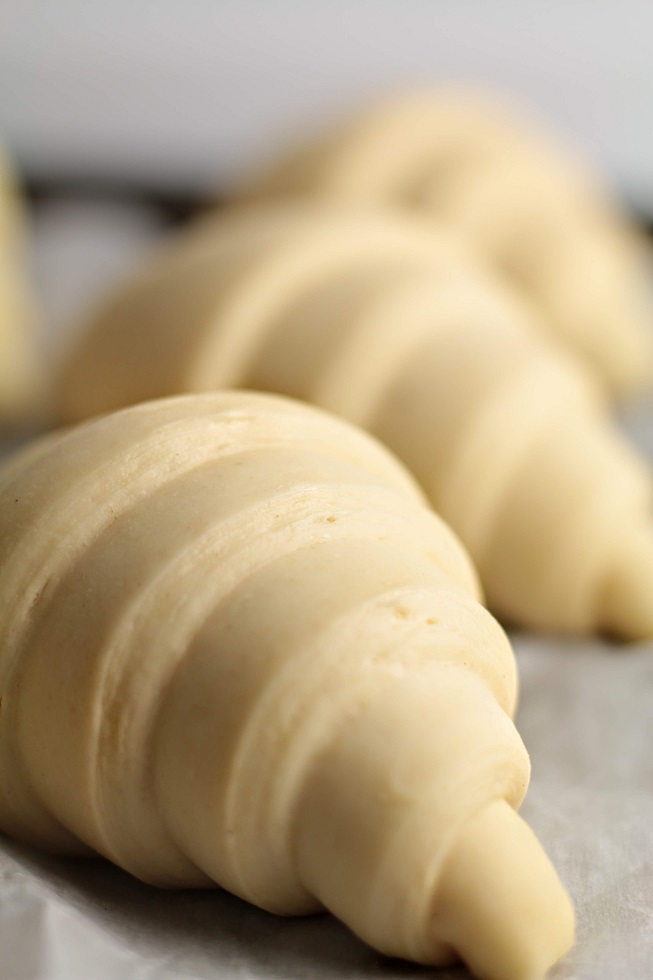
You know its proofed, when its swollen and wobbly. You would also be able to see all the layers.
Fully proofed croissants. Notice the wobble towards the end of the video
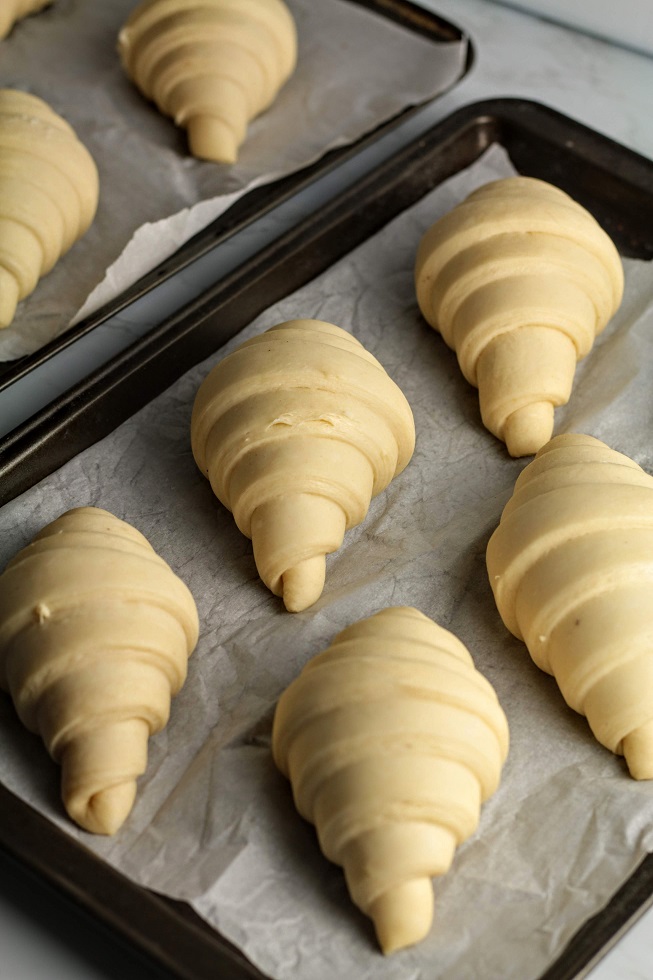
Leaving a gap around croissants is important, as it will stop from sticking together and they will be baked nice and even all around
Once the croissants are ready, pre-heat the oven to 425 ℉ and place a rack in the center. Prepare an egg wash by whisking together two egg yolks and about a tablespoon of water. Once the oven is ready, paint the croissants with a thin even coating of egg wash. Be gentle not to disturb the fragile pastry. Also avoid egg wash dripping around the sides as it will seep to the bottom, get burnt and be messy.
Place the croissants in the oven and bake for about 20 minutes. Then rotate the trays reduce the temperature to 400 ℉ and give another 15 - 20 minutes. Keep an eye on the croissants during the final few minutes as they might burn easily. Once they are evenly golden brown, remove from the oven and place the trays on a wire rack to cool.

These are best served fresh and still warm. If you want to store them, let them cool down completely. Store in an air-tight container at room temperature for up to two days. To keep for longer freeze them sealed in freezer bags. To freshen up frozen croissants, let them thaw and reheat them in a moderate oven for about 5-10 minutes.
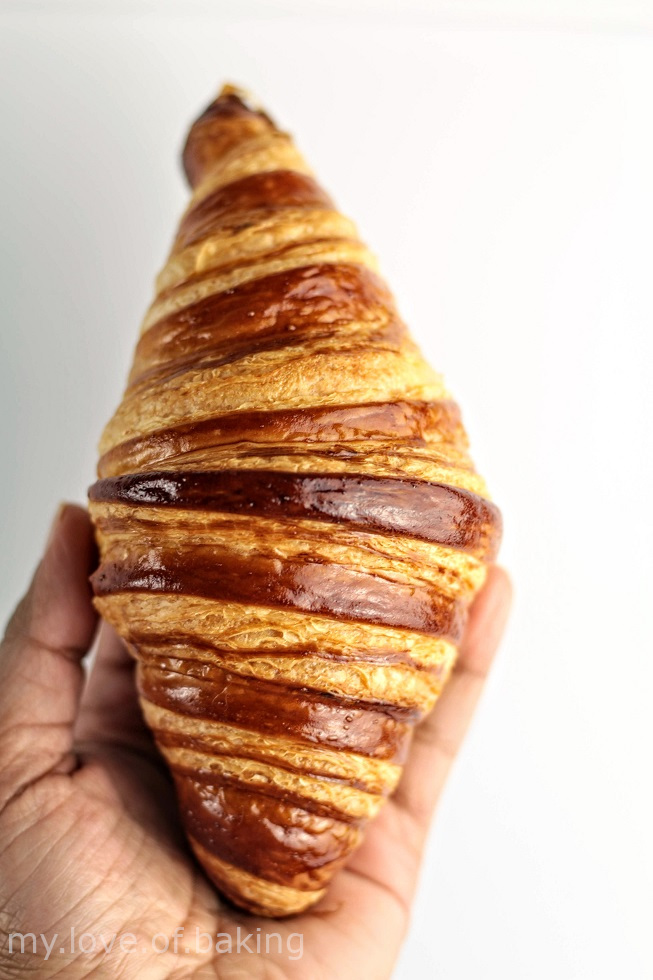
There you have it! Homemade croissants are the best and when they are naturally leavained, it's even better! Get the recipe from below and refer to the above post for execution details. It might take time to get a perfect croissants, but practice makes perfect. Give this a go and let me know how it went. If you have questions please do not hesitate to ask me either on Instagram or use the comments section below!
Check the troubleshooting section below
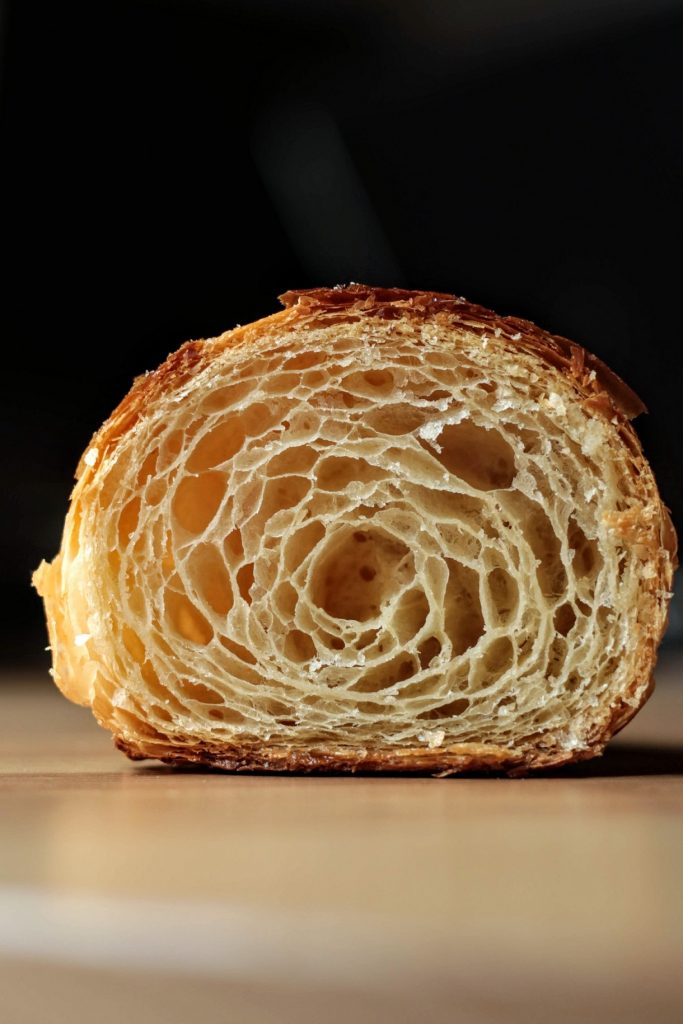
You need to have a sound knowledge on sourdough baking and some experience in laminated pastry, to be able to execute this process and to get the exact results
My usual schedule:

I usually start the process on Thursday and this fits my schedule during the weekend. You don't have to follow this exact schedule, but it will help you get an idea on how to go about it, while not missing out on your work, routine or daily house work/chores.
Day 1 Mid day/Morning : Refresh the starter
My starter usually is kept in the refrigerator. So I let it sit outside to ferment and then feed it once and let it ripe.
Day 1 Night (around 10 p.m): Make the sweet stiff starter
Make the starter and leave on the counter
Day 2 Morning: Make the dough and the butter block
Make the dough, flatten it wrap and refrigerate. Make butter block, wrap and refrigerate
Day 3 Morning 7.00 a.m: Start lamination
Take the butter block out and leave it outside for 5 minutes. Take the dough out and start rolling. Seal the butter in dough and roll out. place in the fridge for 30 - 60 minutes.
Day 3 Morning 8.00 a.m: Complete one fold
Take the dough out finish rolling and fold like a book. Roll the folded dough halfway and place in the fridge.
Day 3 Noon 12.00 p.m.: Complete second fold
Take the dough out finish rolling and fold like a book again. Roll the folded dough halfway and place in the fridge.
Day 3 Afternoon 4.00 p.m.: Roll out to final thickness
Take the dough out cut it in half. Roll each half until the final desired thickness is achieved. Wrap and place place the dough sheets in the fridge to relax.
Day 3 Night 10.00 p.m.: Cut shapes and make croissants
Make the croissants and leave them in the fridge, on trays.
Day 3 Night 10pm -12.00 a.m.: Leave croissants to proof
Arrange croissants on trays lined with baking paper. Cover and leave on the counter top till morning ( temp is around 19 °C) In warmer months, I leave them in the fridge and take out in the morning and leave outside to proof.
Day 4 Morning 7.00 a.m.: Finish off proofing
If they aren't proofed enough, place in a slightly warmer place and keep an eye till they proof. Preheat oven. Make the egg wash.
Day 4 Morning 10.00-11.00 a.m.: Baking
Egg wash and bake the croissants
Day 4 Morning 11.30 a.m.: Served !
Baked croissants are ready to be served. Let them cool slightly before serving

Troubleshooting:
Most common issues, likely causes and how to prevent them
Butter breaking up while rolling:
Could be one of the following;
- dough was too soft or too hard. Check the video and learn to get the dough to the perfect consistency.
- butter block is too hard. You have to take the butter block out and let it soften up a bit, to start rolling. It should feel very cold to the touch but malleable at the same time.
*If your butter seems to breakup while rolling out(speckles), atop rolling out and let the dough sit at room temp for 5 minutes to give time for the butter to go soft slightly. Then roll again.
Dough tearing apart while rolling:
- putting too much pressure. The rolling should be of firm, quick strokes. If your dough doesn't roll out easily or shrink back, it needs more time to relax in the fridge.
- stretching instead of rolling out. It is normal to feel the need to stretch with the rolling pin ( like when you roll out pasta dough). Always try to use single one way rolling strokes so that the dough and the butter are all expanded harmoniously. Use flour to stock dough clinging to the bench and always lift the dough and dust with flour in between every few strokes.
Taking too long to proof:
If your croissants aren't proofing, it could be one of the following
- not given enough time: it would take longer than you'd think and you are used to with yeasted bakes. Give it time some times final proof takes about 18 hours
- not active starter: So you need to fix your starter first
- too low room temperature: Place it in a slightly warmer ( 25 C is ideal) place
Puddle of butter on the tray:
If all the butter melts and oozes out in the oven, that is because one of the following;
- you have left the croissants in a too warm environment. If you left them in a warmer ( higher than 26C) place to proof, place them in a fridge for 10 minutes before baking, to save them
- inconsistent lamination, leaving big butter pieces here and there. Practice lamination techniques, learn to get the dough and butter block to same consistency before lamination.
- oven temperature too low. Use a oven thermometer to pre-heat the oven correctly. Having the door open for too long will take the temperature down, so be quick in placing the croissants in, make sure you are not losing the heat.
- under proofed: When croissants proof, the layers stretch (dough and butter)making the butter layer even thinner. Under proofed croissants has a thicker butter later so it melts before evaporating
Under cooked look and texture on the inside:
- poor lamination. This is because the butter was melted ( gone too soft) and absorbed in to the dough. Work on improving the lamination. Be swift with rolling motions. Always keep the dough as cold as possible while rolling/folding. Do not hesitate to place it in the fridge whenever needed, and take your time rolling the dough.
-Not rolled thin enough: If you didn't roll the final dough thin enough, the butter layer will be too thick. The butter will melt before they get a chance to evaporate
No honey comb (open structure):
- poor lamination. Keep practicing lamination.
- under proofed. Make sure the croissants are fully proofed before baking them. Check if they are puffed up and supper wobbly. This takes practice.
-Not rolled thin enough: If you didn't roll the final dough thin enough, the butter layer will be too thick. The butter will melt leaving a big hole instead of several small holes
Too sour croissants:
It is normal to have slight hint of sour notes, if you don't like this then move onto using commercial yeast instead of sourdough. Or try increasing the sugar content. Palates are different from person to person. My diet is extremely low in sugar, so the sweetness in these croissants are enough for me. If you want it sweeter, increase the sugar content, no brainer...right!
But if they are overpoweringly sour, could be one of those;
- your starter is too acidic. Refresh the starter a couple of times before making the stiff starter. Also make sure your starter is maintained, is healthy and not being neglected or starved
- retarded for too long. Try to cut down on retardation. Bake on the same day they are shaped, instead of leaving in the fridge or letting them proof over night. Place directly in a warmer place to encourage proofing and bake straight, once proofed
Sourdough croissants
Ingredients
Method
- 1
Make the starter the day before and let ferment for 12 hours
- 2
To make the dough, mix flour salt and sugar in a stand mixer
- 3
Add egg, butter, milk and start to mix. As dough comes together, add the starter and mix to combine
- 4
Now add 3/4 cup of water and keep mixing using the dough hook. Add the rest of the water gradually until the dough becomes a stiff ball. You may not need all the water in the recipe. If it is too soft add a bit of flour
- 5
At this stage take the dough off the mixing ball and knead on a surface to make sure everything is combined and dough is even. the dough should be malleable but not too soft
- 6
Pat the dough flat and wrap in plastic wrap. Refrigerate for a day
- 7
Make the butter block. Thaw butter for about 10 minutes and mix with flour until smooth. Scoop out on to a plastic sheet. Place another plastic sheet on top and roll out to form a 3/4 cm thick slab. Wrap and chill
- 8
On the day of lamination, take the butter out and set aside until its malleable (like play dough)
- 9
Take the dough out and check if butter is the same softness as the dough. Then roll out the dough to a rectangle that is twice the size of the butter block(check photo)
- 10
Wrap the butter slab in the dough and seal sides
- 11
Roll out to a about 20 inch rectangle. (place in the fridge to rest if necessary) Check notes below for video guides
- 12
Do a letter fold (or a book fold) and roll out to 20 inches again (be quick and place the dough in the fridge briefly, if it starts to get soft)
- 13
Wrap and place in the fridge for at least for an hour (the longer the better, I usually give about 4 hours between folds)
- 14
Repeat this once for book fold more or twice more for the letter fold
- 15
This can be either 2 book fold or 3 letter folds
- 16
Let the dough chill and relax in between every fold (longer the it relaxes, the easier it will be to roll out next)
- 17
And roll out to about 20 inches again (doesn't have to be exactly this length)
- 18
Wrap and chill for at least 4 hours or up to 10 hours the longer you rest the better!
- 19
The more you work the dough, the longer it needs to be rested. The resting will help relax gluten and would make it way easier to roll out and shape later
- 20
Then take the dough and divide in to two (because it is easier to handle that way) If you are attempting half the recipe, it is not necessary to divide in half
- 21
Roll out the two pieces separately to a rectangular shape (leave the other piece in the fridge while you roll out one)
- 22
Thickness should be about 1/2 cm and roughly 8" of width. The length may vary
- 23
Do not try to roll out in one go. Do a few inches at a time, wrap and chill for about 15 minutes. Continue until desired thickness is achieved
- 24
Wrap and let the dough rest, in the fridge, for at least two hours finally ( if not rested, the dough will be elastic and will pull back when you try to roll)
- 25
Then cut the triangle shapes and make croissants as shown in the images above
- 26
Do not handle the dough for a long time(be quick) as this will melt the butter. Our body temperature is enough to make the butter go soft
- 27
Arrange croissants on a tray leaving ample space around them
- 28
Let these proof until risen and ready to bake (Usually takes about 8-10 hours or more depending on your starter activity and your room temperature
- 29
Preheat the oven to 420°F, use a thermometer to read the internal oven temperature (if your oven is a convection, you may want to heat it up only to 400 °F) Place the rack in the center
- 30
Once proofed, egg wash and bake the croissants for 20 minutes and reduce heat to 380F (400 F) and bake for a further 10-20 minutes ( keep an eye though) Often an extra 10 minutes is enough
- 31
Keep an eye during the bake and if tops start to burn ( change color fast) reduce temperature a bit or cover with a foil
- 32
Once done, let these cool slightly on the tray and serve warm
Notes
Check this video to get an idea of the dough firmness This is a short video of how to roll the dough using swift, gentle yet effective motions Check the troubleshooting guide below to fix any issues you have
Never Miss a Recipe
Get new recipes straight to your inbox.

You might also like


Comments
Loading comments…